WEB DESIGN ACTIVITY (CONTD) - RESUME SITE
PART 4: Dreamweaver Resume Site (DUE FRIDAY, MAR. 9TH)
To assist with training while using Dreamweaver, you should visit the Adobe TV Website and watch some of the introductory lessons on setting up a site. Check out the specific lessons below:
DEFINING YOUR SITE
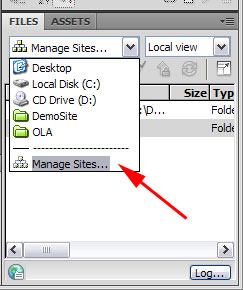
After starting Dreamweaver (in the Web Design folder in our class folder), you'll first need to define your site. To do this, open the Manage Sites drop-down menu in the files window in the lower right of the Dreamweaver workspace (see illustration below). Click on MANAGE SITES and the site management window will open in the middle of the screen.
- DEFINING SITES (extremely important for correctly setting up your site)
- RAPIDLY BUILDING LAYOUTS
- ADDING TEXT & IMAGES
- STYLING TEXT
- ADDING MULTIMEDIA
DEFINING YOUR SITE
After starting Dreamweaver (in the Web Design folder in our class folder), you'll first need to define your site. To do this, open the Manage Sites drop-down menu in the files window in the lower right of the Dreamweaver workspace (see illustration below). Click on MANAGE SITES and the site management window will open in the middle of the screen.
In the Manage Sites window, click NEW and select SITE. You will then be
taken to the step-by-step setup process for your website. This is a fairly simple process (make sure you have the BASIC tab selected at the top of the window. Follow the instructions below to properly set up your site.
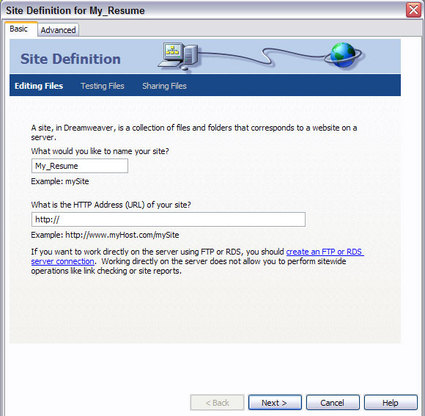
- On the first screen, enter a name for your site (don't use spaces or punctuation). See below. Don't put anything in the HTTP address field. Click NEXT when done.
- On the next screen, make sure "No, I do not want to use server technology" is checked and click NEXT.
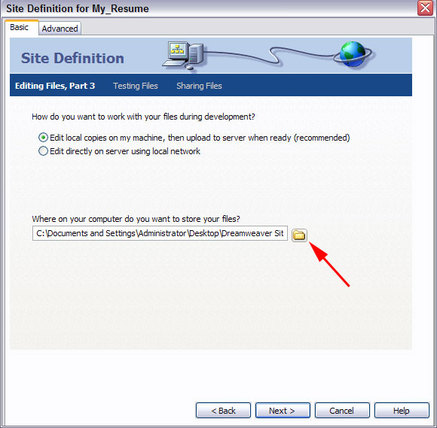
- The next screen is very important, as you need to tell Dreamweaver where on your computer your website will be saved. First, make sure "Edit local copies on my machine..." is checked (first option), then use the field at the bottom to select the Dreamweaver sites folder you created in PART 3 of the activity. Simply click on the folder icon to the left of location field and navigate to your folder location on your computer. Click SELECT once you've opened your Dreamweaver site folder. Click NEXT to move to the next screen.
- On the next screen, open the drop-down menu and select NONE from the options available for connecting to a remote server. Click NEXT to move to the last screen and click DONE to finish setting up your site. You should be taken back to the manage sites window. Select the newly setup site and you should see the FILES area in Dreamweaver update with your folders, etc.
- You will now open each of the HTML pages you exported from Fireworks. You will use Dreamweaver to set up hyperlinks between pages and format page options (including alignment, background colour, etc.)
DREAMWEAVER RESUME SITE REQUIREMENTS
- At least 3 html pages (HOME, WORK and SCHOOL) that were exported from Fireworks.
- Perfect navigation between pages and to external sites (links set up from all buttons and/or graphic files).
- Min. 1 hotspot on a graphic that links to an external website (should have been added in Fireworks).
- At least 1 rollover graphic/image (from slice created in Fireworks). Check out Help menu or Adobe TV for instructions on how to create a rollover. Link this rollover to an external site.
- All pages resaved in HTML format.
WHAT YOU'LL HAND IN (FINAL WEBSITE DUE FRIDAY, MAR. 9TH)
- VERY SIMPLE - drag a copy of your ENTIRE Resume Site folder into your hand-in folder.
- The folder MUST contain all Fireworks PNG files, proper subfolders (as outlined in Part 3) and HTML files.
